公告版位

本站於2009年10月28日成立,本人將盡力提供好的資訊,希望對大家會有幫助。也希望大家可以幫忙點一下廣告,謝謝大家。

歡迎參觀我的賣場

版權所有,引用請註明引用來源,謝謝光臨。 部份文章來源為網路上,如有侵權,請留言,我會馬上刪除,謝謝。

目前分類:網頁設計 (34)

瀏覽方式: 標題列表 簡短摘要

SELECT [欄位1,欄位2…] FROM [資料表名稱] WHERE [條件]

ORDER BY [排序欄位1,排序欄位2...] ASC/DESC 

GROUP BY [群組欄位]

LIMIT 開始,筆數

例:查詢資料表member的全部資料,顯示account跟password欄位

SELECT account,password FROM member

例:查詢資料表member的全部資料,顯示全部欄位

SELECT * FROM member

例:查詢資料表member內account有abc及password是1234的資料,顯示全部欄位

 SELECT * FROM member WHERE account='abc' AND password='1234'

例:查詢資料表member的全部資料, 依account遞增排序,顯示全部欄位

SELECT * FROM member ORDER BY account ASC

例:查詢資料表member的全部資料, 依account遞減排序,顯示全部欄位

SELECT * FROM member ORDER BY account DESC

例:查詢資料表member的全部資料, 依account為群組,顯示全部欄位

SELECT * FROM member GROUP BY account 

例:查詢資料表member的0筆開始,顯示10筆, 顯示全部欄位

SELECT * FROM member LIMIT 0,10 

文章標籤

css6 發表在 痞客邦 留言(0) 人氣()

先到網站下載檔案 https://www.tinymce.com/download/

解壓縮後放網站內。

下載語系檔:https://www.tinymce.com/download/language-packages/

解壓縮後放網站內 /tinymce/plugins/ 改名 jbimages

在網頁<head>...</head>之間加上:

<script src="./tinymce/tinymce.min.js"></script>
<script>
tinymce.init({
    selector: '#memo',
    theme : "modern",
    language : "zh_TW" ,
    plugins: [
    "advlist autolink lists link image charmap print preview anchor",
    "searchreplace visualblocks code fullscreen",
    "insertdatetime media table contextmenu paste jbimages"
  ],

  toolbar: "insertfile undo redo | styleselect | bold italic | alignleft aligncenter alignright alignjustify | bullist numlist outdent indent | link image jbimages",
    
  relative_urls: false
  });
</script>

修改上傳圖片的路徑:/tinymce/plugins/jbimages/config.php

$config['img_path'] = '/mpic'; // 相對路徑


已經加入中文,修改plugin為中文檔案下載:

https://mega.nz/#F!ENoA2ZRL!5xkmN92M9RFKzvHFMlfNTg


css6 發表在 痞客邦 留言(0) 人氣()

先在頁首<head>...</head>之間輸入, jquery.validate.js檔案可以由https://www.dropbox.com/s/s60mth7nj38s52y/validate...下載,裡有壓縮與未壓縮檔案,只要連一個js檔就可以。

<link rel="stylesheet" href="//code.jquery.com/ui/1.11.4/themes/smoothness/jquery-ui.css">
<script src="//code.jquery.com/jquery-1.10.2.js"></script>
<script src="//code.jquery.com/ui/1.11.4/jquery-ui.js"></script>

<script src="../js/jquery.validate.js" type="text/javascript"></script>

<script type="text/javascript">
$().ready(function() {
// validate signup form on keyup and submit
$("#form1").validate({
rules: {
pclass:"required",
pmath:{
required:true,
digits:true
},
password: {
required:true,
minlength:6,
},
password1: {
equalTo: "#password"

}

},
messages: {
pclass:"請選擇產品分類",
pmath:{
required:"請輸入產品庫存量",
digits:"請輸入數字"
},
password: {
required:"請輸入密碼",
minlength:"密碼要6個字以上"
},
password1: {
equalTo: "確認密碼要與密碼相同"

},

}
});
});
</script>

上面範例pclass:"required",pclass欄位名稱是必要的

pmath:{
required:true,
digits:true
},

欄位pmath是必要的,而且一定要整數

參數(參考http://www.minwt.com/webdesign-dev/js/1800.html

required:必填欄位
email:格式要符合E-Mail格式
url:格式要符合網址格式,如:http://css6.pixnet.net 
number:數字格包含小數點
digits:數字為正整數
date:日期格式
dateISO:日期格式,格式必需為YYYY/MM/DD、YYYY-MM-DD、YYYYMMDD
equalTo:與某一欄位值相同

minValue:最小字元長度
maxValue:最大字元長度
rangeValue:字元長度區間長度

minLength:最小字元長度(漢字算一個字符)
maxLength:最大字元長度(漢字算一個字符)
rangeLength:字元長度區間長度(漢字算一個字符)

文章標籤

css6 發表在 痞客邦 留言(0) 人氣()

<form name="form1" method="post" action="">
<label for="mname">姓名:</label>
<input type="text" name="mname" id="mname" pattern="[0-9]{4,12}">
</form>

. 任意字元
\d 數字
\D 非數字
\s 空白字元
\S 非空白字元
\w 英文字母或數字
\W 非英文字母或數字
[0-9] 一個數字
[a-z] 一個小寫英文字母
[A-Za-z0-9] 一個大寫或小寫字母或一個數字
[0-9]{4} 可以輸入4個數字
[0-9]{4,12} 可以輸入4~12個數字

css6 發表在 痞客邦 留言(0) 人氣()

1  

1.先下載jqueryDate.zip

2.解壓縮到網站內,會有三個資料夾。

2  

css內的檔案,是可以修改顏色。

calendar-blue.css 藍色

calendar-brown.css 咖啡色

JS內的檔案是所需的JavaScript檔案。

jquery.dynDateTime.js、jquery.dynDateTime.pack.js、jquery.js

lang是語系,通常是用calendar-utf8.js,使用的是UTF-8語系。

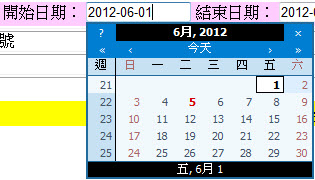
請把下面語法放到網頁的<head>...</head>之間,請先拷到「記事本」,再拷到網頁,可以避免亂碼。

<link rel="stylesheet" type="text/css" media="all" href="css/calendar-blue2.css"  />
 <script type="text/javascript" src="JS/jquery.js"></script>
 <script type="text/javascript" src="JS/jquery.dynDateTime.js"></script>
 <script type="text/javascript" src="lang/calendar-utf8.js"></script>
 <script type="text/javascript">
$(document).ready(function() {
   $("#workin").dynDateTime({
    ifFormat:"%Y-%m-%d"
   });
});
    </script>

語法說明:

<link rel="stylesheet" type="text/css" media="all" href="css/calendar-blue2.css"  />  連結到css/calendar-blue2.css,這是藍色的日期選擇器
 <script type="text/javascript" src="JS/jquery.js"></script>  連結到jquery.js檔案,這是必要的
 <script type="text/javascript" src="JS/jquery.dynDateTime.js"></script>  連結到jquery.dynDateTime.js檔案,這是必要的
 <script type="text/javascript" src="lang/calendar-utf8.js"></script> 連結到jquery.dynDateTime.js檔案,這是語系檔
<script type="text/javascript">
$(document).ready(function() {
   $("#workin").dynDateTime({     #workin是要使用日期選擇器的表單欄位id,可以有多個
    ifFormat:"%Y-%m-%d" 
   });
   $("#workout").dynDateTime({
    ifFormat:"%Y-%m-%d"
   });
});
    </script>

文章標籤

css6 發表在 痞客邦 留言(0) 人氣()

16.png  

動作:

import flash.events.Event;
import fl.events.SliderEvent

var sound:Sound=new Sound(new URLRequest("1.mp3"));  //載入1.mp3
var soundCtl:SoundChannel=new SoundChannel();  //宣告SoundChannel
var transformSound:SoundTransform=new SoundTransform();  //宣告SoundTransform
transformSound.volume=1; //預設音量:1最大聲,0~1
soundCtl.soundTransform=transformSound;  //設定SoundChannel的音量
var setre:Number=0;  //播放的位置
var soundVolume:Number=10;  //音量改成0~10

sound.addEventListener(Event.COMPLETE,$complete);  //音樂載入完成
function $complete($e:Event):void{  //音樂載入完成的執行函數
 soundCtl=sound.play();  //播放(位置=0,重覆次數:無限次)
 soundCtl.addEventListener(Event.SOUND_COMPLETE,$soundComplete);  //播放完畢的監聽事件
 stop_btn.addEventListener(MouseEvent.CLICK,$stop);  //停止鍵的監聽
 play_btn.addEventListener(MouseEvent.CLICK,$play);  //播放鍵的監聽
 pause_btn.addEventListener(MouseEvent.CLICK,$pause);//暫停鍵的監聽
 pre_btn.addEventListener(MouseEvent.CLICK,$pre);    //上一首鍵的監聽
 next_btn.addEventListener(MouseEvent.CLICK,$next);  //下一首鍵的監聽
 vol_btn.up_btn.addEventListener(MouseEvent.CLICK,$up);    //音量大聲鍵的監聽
 vol_btn.down_btn.addEventListener(MouseEvent.CLICK,$down);//音量小聲鍵的監聽
}
function $soundComplete($e:Event){  //播放完畢的執行函數
 if(cont<5){  //共有5首mp3
  cont+=1; //跳下一首
 }else{
  cont=1;  //跳第1首
 }
 soundCtl.stop();  //先停止上一首mp3
 sound=new Sound(new URLRequest(cont + ".mp3"));  //載入下一首mp3
 soundCtl=sound.play();        //播放
 soundCtl.addEventListener(Event.SOUND_COMPLETE,$soundComplete);  //播放完畢的監聽事件
}
function $stop($e:MouseEvent):void{  //停止的執行函數
 soundCtl.stop();  //音樂停止
 setre=0;          //音樂位置:0,所以按「播放」時,會從頭播放
}

function $play($e:MouseEvent):void{  //播放的執行函數
 soundCtl=sound.play(setre,0);
}

function $pause($e:MouseEvent):void{  //暫停的執行函數
 setre=soundCtl.position;  //紀錄音樂的位置
 soundCtl.stop();          //音樂停止
}

function $next($e:MouseEvent):void{  //下一首的執行函數
 if(cont<5){  //共有5首mp3
  cont+=1; //跳下一首
 }else{
  cont=1;  //跳第1首
 }
 soundCtl.stop();  //先停止上一首mp3
 sound=new Sound(new URLRequest(cont + ".mp3"));  //載入下一首mp3
 soundCtl=sound.play();        //播放
 soundCtl.addEventListener(Event.SOUND_COMPLETE,$soundComplete);  //播放完畢的監聽事件
}

function $pre($e:MouseEvent):void{  //上一首的執行函數
 if(cont==1){  //如果在第1首,那上一首是第5首
  cont=5;
 }else{
  cont-=1;  //跳上一首
 }
 soundCtl.stop();  //先停止上一首mp3
 sound=new Sound(new URLRequest(cont + ".mp3"));  //載入上一首mp3
 soundCtl.addEventListener(Event.SOUND_COMPLETE,$soundComplete);  //播放完畢的監聽事件
 soundCtl=sound.play();       //播放
}

function $up($e:MouseEvent):void{  //音量調整大聲的執行函數
 if(soundVolume<10){  //音量小於10
         soundVolume+=2; //音量+2
   vol_btn.gotoAndStop(soundVolume/2+1);  //音量到適合的關鍵影格
    }
 transformSound.volume=soundVolume/10;    //音量0~10轉成0~1
    soundCtl.soundTransform=transformSound;  //設定音樂音量
}

function $down($e:MouseEvent):void{  //音量調整小聲的執行函數
    if(soundVolume>0){      //音量大於0
           soundVolume-=2;  //音量-2
     vol_btn.gotoAndStop(soundVolume/2+1);//音量到適合的關鍵影格
    }
 transformSound.volume=soundVolume/10;   //音量0~10轉成0~1
    soundCtl.soundTransform=transformSound; //設定音樂音量
}

如需範例檔,請MAIL:css6666@yahoo.com.tw

如果您認為內容不錯,也請幫我點個廣告,謝謝。

css6 發表在 痞客邦 留言(0) 人氣()

import flash.events.Event;
import fl.events.SliderEvent

var sound:Sound=new Sound(new URLRequest("1.mp3"));  //載入1.mp3
var soundCtl:SoundChannel=new SoundChannel();  //宣告SoundChannel

sound.addEventListener(Event.COMPLETE,$complete);  //音樂載入完成
function $complete($e:Event):void{  //音樂載入完成的執行函數
 soundCtl=sound.play();  //播放(位置=0,重覆次數:無限次)
 soundCtl.addEventListener(Event.SOUND_COMPLETE,$soundComplete);  //播放完畢的監聽事件
 stop_btn.addEventListener(MouseEvent.CLICK,$stop);  //停止鍵的監聽
 play_btn.addEventListener(MouseEvent.CLICK,$play);  //播放鍵的監聽
 pause_btn.addEventListener(MouseEvent.CLICK,$pause);//暫停鍵的監聽
}
function $soundComplete($e:Event){  //播放完畢的執行函數
 if(cont<5){  //共有5首mp3
  cont+=1; //跳下一首
 }else{
  cont=1;  //跳第1首
 }
 soundCtl.stop();  //先停止上一首mp3
 sound=new Sound(new URLRequest(cont + ".mp3"));  //載入下一首mp3
 soundCtl=sound.play();        //播放
 soundCtl.addEventListener(Event.SOUND_COMPLETE,$soundComplete);  //播放完畢的監聽事件
}
function $stop($e:MouseEvent):void{  //停止的執行函數
 soundCtl.stop();  //音樂停止
 setre=0;          //音樂位置:0,所以按「播放」時,會從頭播放
}

function $play($e:MouseEvent):void{  //播放的執行函數
 soundCtl=sound.play(setre,0);
}

function $pause($e:MouseEvent):void{  //暫停的執行函數
 setre=soundCtl.position;  //紀錄音樂的位置
 soundCtl.stop();          //音樂停止
}

如需範例檔,請MAIL:css6666@yahoo.com.tw

如果您認為內容不錯,也請幫我點個廣告,謝謝。
css6 發表在 痞客邦 留言(0) 人氣()

動作:

import flash.events.Event;
import fl.events.SliderEvent

var sound:Sound=new Sound(new URLRequest("1.mp3"));  //載入1.mp3
var soundCtl:SoundChannel=new SoundChannel();  //宣告SoundChannel

sound.addEventListener(Event.COMPLETE,$complete);  //音樂載入完成
function $complete($e:Event):void{  //音樂載入完成的執行函數
 soundCtl=sound.play();  //播放(位置=0,重覆次數:無限次)
}


如需範例檔,請MAIL:css6666@yahoo.com.tw

如果您認為內容不錯,也請幫我點個廣告,謝謝。

css6 發表在 痞客邦 留言(0) 人氣()

11.png

插入>>新增元件>>影片片段,如下圖:

15.png

屬性:

12.png13.png14.png  

動作:

import flash.events.Event;

this.stage.addEventListener(Event.ENTER_FRAME,$change);

function $change($e:Event):void{
 var time1:Date=new Date();
 h_mc.rotation=360/12*time1.getHours()+360/12/60*time1.getMinutes();
 m_mc.rotation=360/60*time1.getMinutes();
 s_mc.rotation=360/60*time1.getSeconds();
}

如需範例檔,請MAIL:css6666@yahoo.com.tw

如果您認為內容不錯,也請幫我點個廣告,謝謝。

文章標籤

css6 發表在 痞客邦 留言(0) 人氣()

5.png

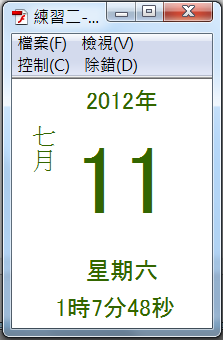
拉5個文字框

4.png  

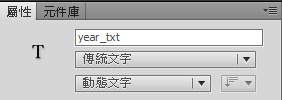
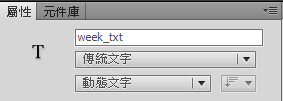
屬性:

6.png7.png8.png9.png10.png  

動作:

import fl.motion.Color;

this.stage.addEventListener(Event.ENTER_FRAME,$chang);
function $chang($e:Event):void{
 var time1:Date=new Date();
 //time_txt.text=time1.toString();
 year_txt.text=time1.getFullYear().toString() + "年";
 switch (time1.getDay()){ //0~11,0代表1月,11代表12月
  case 0:
   month_txt.text="一月";
   break;
  case 1:
   month_txt.text="二月";
   break;
  case 2:
   month_txt.text="三月";
   break;
  case 3:
   month_txt.text="四月";
   break;
  case 4:
   month_txt.text="五月";
   break;
  case 5:
   month_txt.text="六月";
   break;
  case 6:
   month_txt.text="七月";
   break;
  case 7:
   month_txt.text="八月";
   break;
  case 8:
   month_txt.text="九月";
   break;
  case 9:
   month_txt.text="十月";
   break;
  case 10:
   month_txt.text="十一月";
   break;
  case 11:
   month_txt.text="十二月";
   break;
 } 
 date_txt.text=time1.getDate().toString();

 switch (time1.getDay()){ //0~6,0代表星期日,6代表星期六
  case 1:
   week_txt.text="星期一";
   break;
  case 2:
   week_txt.text="星期二";
   break;
  case 3:
   week_txt.text="星期三";
   break;
  case 4:
   week_txt.text="星期四";
   break;
  case 5:
   week_txt.text="星期五";
   break;
  case 6:
   week_txt.text="星期六";
   break;
  case 0:
   week_txt.text="星期日";
   break;
 }
 time_txt.text=time1.getHours().toString() + "時";
 time_txt.text+=time1.getMinutes().toString() + "分";
 time_txt.text+=time1.getSeconds().toString() + "秒";
 if(time1.getDay()==6){
  year_txt.textColor=0x336600;
  date_txt.textColor=0x336600;
  month_txt.textColor=0x336600;
  week_txt.textColor=0x336600;
  time_txt.textColor=0x336600;
 }
 if(time1.getDay()==0){
  year_txt.textColor=0xFF0000;
  date_txt.textColor=0xFF0000;
  month_txt.textColor=0xFF0000;
  week_txt.textColor=0xFF0000;
  time_txt.textColor=0xFF0000;
 }
}

 如需範例檔,請MAIL:css6666@yahoo.com.tw

如果您認為內容不錯,也請幫我點個廣告,謝謝。

css6 發表在 痞客邦 留言(0) 人氣()

先用文字工具拉二個動態文字

1.png  

p>

屬性:

2.png3.png  


動作:

import flash.events.Event;

this.stage.addEventListener(Event.ENTER_FRAME,$chang);
function $chang($e:Event):void{
 var time1:Date=new Date();
 //time_txt.text=time1.toString();
 date_txt.text=time1.getFullYear().toString() + "年";
 date_txt.text+=(time1.getMonth()+1).toString() + "月";
 date_txt.text+=time1.getDate().toString() + "日";
 //date_txt.text+="星期" + time1.getDay().toString();
 switch (time1.getDay()){ //0~6,0代表星期日,6代表星期六
  case 1:
   date_txt.text+="星期一";
   break;
  case 2:
   date_txt.text+="星期二";
   break;
  case 3:
   date_txt.text+="星期三";
   break;
  case 4:
   date_txt.text+="星期四";
   break;
  case 5:
   date_txt.text+="星期五";
   break;
  case 6:
   date_txt.text+="星期六";
   break;
  case 0:
   date_txt.text+="星期日";
   break;
 }
 time_txt.text=time1.getHours().toString() + "時";
 time_txt.text+=time1.getMinutes().toString() + "分";
 time_txt.text+=time1.getSeconds().toString() + "秒";
}

 如需範例檔,請MAIL:css6666@yahoo.com.tw

如果您認為內容不錯,也請幫我點個廣告,謝謝。

css6 發表在 痞客邦 留言(0) 人氣()

<script language="javascript">
function DoPrint()
{
try
{
// 設定頁首頁尾及邊界
var ret = saveAndClearSetting();

// 列印
window.print();
window.close();
}
catch (e)
{
alert("err="+e.description);
}
}
var hkey_path = "HKEY_CURRENT_USER\\Software\\Microsoft\\Internet Explorer\\PageSetup\\";
var hkey_key_header = hkey_path + "header"; // 頁首
var hkey_key_footer = hkey_path + "footer"; // 頁尾
var hkey_key_margin_bottom = hkey_path + "margin_bottom"; // 邊界(下)
var hkey_key_margin_left = hkey_path + "margin_left"; // 邊界(左)
var hkey_key_margin_right = hkey_path + "margin_right"; // 邊界(右)
var hkey_key_margin_top = hkey_path + "margin_top"; // 邊界(上)
var topMargin = 5; //***注意: IE預設的單位為公厘(mm)
var leftMargin = 5;
var rightMargin = 5;
var bottomMargin = 5;

// 設定頁首頁尾及邊界
function saveAndClearSetting()
{
try
{
var RegWsh = new ActiveXObject("WScript.Shell");
RegWsh.RegWrite(hkey_key_header, ""); //頁首頁尾設為空白
RegWsh.RegWrite(hkey_key_footer, "");
RegWsh.RegWrite(hkey_key_margin_bottom, parseFloat(bottomMargin)/10/2.54); //***注意: 登錄值的單位為公吋
RegWsh.RegWrite(hkey_key_margin_right, parseFloat(rightMargin)/10/2.54);
RegWsh.RegWrite(hkey_key_margin_left, parseFloat(leftMargin)/10/2.54);
RegWsh.RegWrite(hkey_key_margin_top, parseFloat(topMargin)/10/2.54);
return true;
}
catch (e)
{
if ( e.description.indexOf("伺服程式無法產生物件") != -1 )
alert("請調整IE瀏覽器的安全性\n網際網路選項\安全性\自訂層級\n「起始不標示為安全的ActiveX控制項」設定為啟用或提示。");
else
alert("ERR="+e.description);
}
return false;
}
</script>
</head>

<body onload="DoPrint()">

css6 發表在 痞客邦 留言(0) 人氣()

<HTML><HEAD><TITLE>自動分頁列印!</TITLE></HEAD>
<BODY onLoad='printPage()'>

<SCRIPT LANGUAGE='JavaScript'>
<!--// 自動列印: 會彈出印表機交談視窗
function printPage() {
window.print();
}
//-->
</SCRIPT>

<CENTER>這是列印的第一頁!</CENTER>

<P style='page-break-after:always'></P>

<CENTER>這是列印的第二頁!</CENTER>

</BODY>
</HTML>

第二段寫法:
<div STYLE="page-break-after: always;">
第一頁
</div>
第二頁

第三段寫法:
第一頁
<P style='page-break-after:always'> </P>
第二頁

css6 發表在 痞客邦 留言(0) 人氣()

Javascript,在頁框顯示網頁
<script type="text/javascript">
parent.frames['leftFrame'].location='left.php';
</script>

css6 發表在 痞客邦 留言(0) 人氣()

申請免費網站空間(中文的哦)

1.輸入網址:http://er-webs.com/,看到如圖畫面,按「Start Here」

2.看到如下圖,請輸入,按「註冊」。電子郵件建議用gmail的,奇摩站及Hotmail好像會收不到啟動信。

3.請按「

4.輸入驗證碼,按「Register」

5.出現下圖代表已寄出啟動mail到你的信箱。

6.請到你的Email信箱收信,會有如下圖的啟動信,請打開。

7.請點選如圖紅框內連結,以啟動。

8.輸入驗證碼,按「Register」

9.出現下圖為你的註冊資訊,請保留。你可以按「download」下載。

10.請到你的Email信箱收信,會有如下圖的信,請打開,內有你的帳號資訊,請保留。

css6 發表在 痞客邦 留言(0) 人氣()

1.請先設定IP分享器內的「固定IP」,這要先看你的電腦的「閘道器」,通常「閘道器」就是你的IP分享器。以WINDOWS 7 為例,開始>>控制台>>網路和共用中心>>變更介面卡設定>>區域網路 點二下>>詳細資料

2.我的閘道器IP是192.168.0.1,所以這就是我的IP分享器的網址,那我的電腦就可以使用192.168.0.2~192.168.0.254範圍內的IP,假設我設「192.168.0.6」。按「關閉」,按「內容」,在「網際網路通訊協定第4版(TCP/IPv4)」上點二下,設定如下:如果你家的寬頻是「中華電信」的,慣用DNS伺服器設定如下:如果是其他的,可以設定到IP分享器的IP。設定一組就好。

如果你的IP分享器的IP是「192.168.2.1」,則你可以使用的IP範圍就是192.168.2.2~192.168.2.254,前面的三個數字會相同,最後的數字從2開始,到254結束。


 3.上網,開啟瀏覽器,網址輸入:192.168.0.1,就是你的IP分享器的IP位置,準備設定IP分享器的NAT。

4.我IP分享器是D-Link DI-524UP,進入後輸入帳號及密碼,再按上面的「進階功能」,左邊點選「虛擬伺服器」,點下面「Virtual Server HTTP」右邊的,上面設定如圖:

5.以上是網站的設定,如果是FTP的設定,則點「Virtual Server FTP」右邊的,上面設定如圖:

6.設定完按「套用」,再把IP分享器重開,別人就可以用外部IP連到對應的內部IP了。

7.別廠牌的IP分享器做法類似,只要記得「中文」或「英文」選項,依照如上設定,應該就可以了。下面是英文畫面:

如有設定上的問題,請留言,我會盡力為你解決。

你可以參考:

Appserv網站伺器的下載及安裝設定

不用安裝的PHP伺服器-XAMPP

用免安裝伺服器xampp架設ftp網站教學

xampp-建立ftp帳號

xampp修改MySQL密碼

xampp的SMTP設定

xampp如果放在不是根目錄的解決方法


css6 發表在 痞客邦 留言(23) 人氣()

JQUERY-在表單文字欄位輸入開頭文字,自動顯示相關文字

如:http://game.acd.idv.tw的搜尋

請先下載:http://ok6.cc/~css/100920/jaueryautocomplete.zip

下面範例需要資料庫哦,所以要自行建立資料庫哦。

在<head>...</head>之間加上下面語法:

<link rel="stylesheet" type="text/css" href="jquery.autocomplete.css" />
<script type="text/javascript" src="jquery.js"></script> 
<script type="text/javascript" src="jquery.autocomplete.js"></script>
<script type="text/javascript"> 
$(function() {       
  $("#t1").autocomplete("s.php", {matchContains: true});      
});  
</script>

在<body>...</body>之間加上下面語法:

<form id="form1" name="form1" method="post" action="">
  <label for="t1"> </label>
  <input type="text" name="t1" id="t1" />
</form>

開一個新的php檔案,儲存成「s.php」,語法如下:

<?php  
header('Content-Type: text/html;charset=UTF-8');
require_once('Connections/conn.php');
if (!function_exists("GetSQLValueString")) {
function GetSQLValueString($theValue, $theType, $theDefinedValue = "", $theNotDefinedValue = "")
{
  if (PHP_VERSION < 6) {
    $theValue = get_magic_quotes_gpc() ? stripslashes($theValue) : $theValue;
  }

  $theValue = function_exists("mysql_real_escape_string") ? mysql_real_escape_string($theValue) : mysql_escape_string($theValue);

  switch ($theType) {
    case "text":
      $theValue = ($theValue != "") ? "'" . $theValue . "'" : "NULL";
      break;   
    case "long":
    case "int":
      $theValue = ($theValue != "") ? intval($theValue) : "NULL";
      break;
    case "double":
      $theValue = ($theValue != "") ? doubleval($theValue) : "NULL";
      break;
    case "date":
      $theValue = ($theValue != "") ? "'" . $theValue . "'" : "NULL";
      break;
    case "defined":
      $theValue = ($theValue != "") ? $theDefinedValue : $theNotDefinedValue;
      break;
  }
  return $theValue;
}
}
$colname_Recordset1 = "%";
if (isset($_GET['q'])) {
 $colname_Recordset1 = $_GET['q']; 
}
//if (!$q) return; 
mysql_select_db($database_conn, $conn);
$query_Recordset1 = sprintf("SELECT gname FROM games WHERE gname LIKE %s LIMIT 0 , 10", GetSQLValueString("%" . $colname_Recordset1 . "%", "text"));
$Recordset1 = mysql_query($query_Recordset1, $conn) or die(mysql_error());
$row_Recordset1 = mysql_fetch_assoc($Recordset1);
do{
     printf("%s\n" ,$row_Recordset1['gname'] );
} while ($row_Recordset1 = mysql_fetch_assoc($Recordset1));
?> 

就可以用了。

css6 發表在 痞客邦 留言(5) 人氣()

網站內容推到Facebook的方法:

我們可以在做網站時,讓網友可以把網站內容推到Facebook的「塗鴉牆」。

 請先在網頁的<head>到</head>之間,放上下面的語法:如果你是使用Dreamweaver,請放在「程式碼」。

<meta name="title" content="遊戲巢-美奇電腦-好玩小遊戲-機器人大戰" />
<meta name="description" content="記住左邊機器人頭上出現的← → ↑ ↓跟笑臉.笑臉是空白鍵.
換右邊機器人玩時.照剛才記住的去按..像記憶的跳舞機" />
<link rel="image_src" href="http://game.acd.idv.tw/game/2010072903.jpg" />


再把下面語法放在你要出現「推到Facebook」文字的地方:

<a href="javascript: void(window.open('http://www.facebook.com/share.php?u='.concat(encodeURIComponent(location.href)) ));">[推到 Facebook]</a>

就可以了哦。


css6 發表在 痞客邦 留言(1) 人氣()

按如圖的「Admin」

按如圖的「ok」

按工具列的

按「Add」新增使用者

輸入使用者名稱,這裡範侁為「hp」,按「OK」

勾選「Enable account」可以啟用這個帳戶。勾選「Password」輸入密碼,使用者連線時需要密碼才可進來。

選左邊的「Shared folder」按「Add」,可以選擇使用者可以使用的資料夾。

右邊有檔案權限及資料夾權限。

檔案權限:Read:可以讀取檔案、Write可以寫入檔案、Delete可以刪除檔案、Append可以新增檔案。

資料夾權限:Create:可以建立資料夾、Delete:可以刪除資料夾、List:可以顯示資料夾、+Subdirs:可以看到子資料夾

使用FileZilla試試看,終於可以連線了。

css6 發表在 痞客邦 留言(5) 人氣()

1、在xampp的資料夾內,執行「xampp-control.exe」,會出現下圖,

2、在「Svc FileZilla」的前面核取方塊打勾,出現下圖,按「確定」

3、出現下圖,按「是」

4、伺服器就啟動了。


css6 發表在 痞客邦 留言(0) 人氣()

1 2
Close

您尚未登入,將以訪客身份留言。亦可以上方服務帳號登入留言

請輸入暱稱 ( 最多顯示 6 個中文字元 )

請輸入標題 ( 最多顯示 9 個中文字元 )

請輸入內容 ( 最多 140 個中文字元 )

reload

請輸入左方認證碼:

看不懂,換張圖

請輸入驗證碼